PIC interrupt tutorial
PIC interrupt tutorial: General Background
CLICK here for a quick PIC interrupt tutorial
In this tutorial we will study about the Polling and especially on the PIC Interrupt. We will look at:
- the different types of PIC interrupts
- the existing PIC interrupts
- the settings of the requeried registers to work with PIC interrupts
- the implementation of the external PIC interrupts (C program and a video)
Computer systems include microcontroller, which includes timers, serial communication system, analog digital converter, and much more.
Many times it is also external systems, located outside the micro itself which are communicating with micro through control lines.
An example of such a system is a digital thermometer, which is measure the temperature and at the end of the measurements transmitting the results to the PIC micro.
How does the processor know to get the required information from the external system?
This operation can be performed in two ways:
- using polling
- using interrupts
A) The first method is the simple one - Polling:
Using this method, the microcontroller accesses at the exact time interval the external device, and gets the required information. The user is the one who determines the time intervals in which micro “contacts” the device.
In the Polling method, the PIC microcontroller must "access by himself" the device and “ask” for the information it needs for processing. In fact we see that in the Polling method the external devices are not independent systems; they depend on the microcontroller, and only the micro is entitled to obtain access to the information it needs.
The main drawback of this method when writing program is waste of time of microcontroller, which needs to wait and check whether the new information has arrived.
B) The second method is - Interrupt:
Interrupt is the signal sent to the micro to mark the event that requires immediate attention. Interrupt is “requesting" the processor to stop to perform the current program and to “make time” to execute a special code. In fact, the method of interrupt defines the option to transfer the information generated by internal or external systems inside the micro by them self! Once the system has finished the task imposed on it, the processor will be notified that it can access and receive the information and use it.
The “request” for the microcontroller to “free itself” to execute the interrupt could come from several sources:
- External hardware devices. Common example is pressing on the key on the keyboard, which causes to the keyboard to send Interrupt to the microcontroller to read the information of the pressed key.
- The processor can send interrupts to itself as a result of executing the program, to report an error in the code. For example, division by 0 will causes an interrupt.
- In the multi-processor system, the processors can send to each other interrupts as a way to communicate.
There are two types of PIC interrupts:
Software interrupts - come from a program that runs by the processor and “request” the processor to stop running the program, go to make an interrupt and then to return to continue to execute the program.
An example: Procedure - when there is a procedure call, the processor stops the execution of the program, jumps to the place in memory that reserved for a procedure – executes the procedure and only then returns back to the program and continues to execute.
Hardware interrupts -these are sent to microcontroller by hardware devices as a third-party; some of them can be blocked - (masking) by Interrupt Enable bit (IE). When the interrupt is “blocked”, the PIC microcontroller does not "see" the request for the interrupt and will not execute it. In fact the blocked interrupt will not be executed until it will be unblocked.
For example: The processor is in the middle of a calculation, and we do not want to write into memory until the micro did not finish the calculation. In this situation, we will “block” the "write to the memory" interrupt. We will “unblock” the interrupt only after the processor finished the calculation, thus preventing him to write into the memory as long as it is in the middle of the action. There are some interrupts that can not be “masked”/”blocked” - NMI - Non Mask able Interrupts. They are used to report on critical hardware issues, such as the drop of voltage. In this situation we are interested in immediate response from the processor without the ability to ignore them.
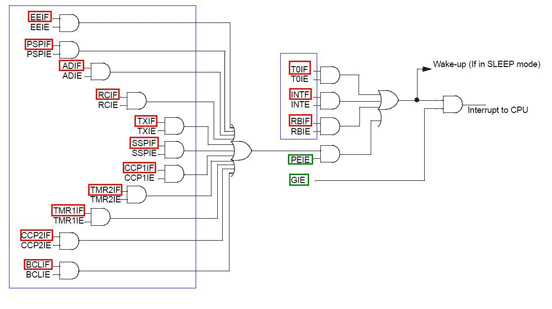
Let’s explore the existing interrupts within the PIC16F877 microcontroller:
The microcontroller has 14 interrupt sources. From the diagram below you can see all the sources of the interrupts, when xxIF is an interrupt flag and xxIE is an Interrupt Enable bit. Interrupt flag shows the result of an interrupt and interrupt enable bit is used to enable or to “block” the interrupt. The interrupts on the left side of the figure below are low priority and all of them together can be “blocked” by enabling bit interrupt PEIE = 0.
We can also determine whether to allow the system shown in figure below to treat or block all of the interrupts. This is done by using the global interrupt enable bit - GIE. When the GIE = 1 we are enabling the interrupts, and if the GIE = 0 we are blocking all of the interrupts.
CLICK HERE for the explantion of the existing PIC microcontroller interrupts
How to set the required registers to work with interrupts?
The settings of the interrupts are done by using 3 interrupt control registers:
- INTCON – This register contains the status of the high-priority interrupts (see diagram above) and general definitions.
- PIE (PIE1, PIE2) – This register contains the interrupt enabling bits of the low-priority interrupts.
- PIR (PIR1, PIR2) – This register contains the interrupt flags of the low-priority interrupts.
CLICK HERE to look at the interrupt control registers in more details
Writing a C language program to implement external interrupt
Let’s write an example program, where we will explore the way we need to define the external interrupt connected to PORTB pin RB0. The program will play a sound from a buzzer that is located on the EduPIC development board, every time there is an external interrupt that is generated through RB0 pin.
To make our live trouble-free we will not connect any external device to the PORTB0. Instead, we will “create an external interrupt” using our program itself, by incrementing the value of PORTB by 1.
As explained above, when there is a logic change in the pin RB0, from "0" to "1", the external interrupt flag will be set INTF = 1.
In this section of code, we will increase the value of PORTB by 1 (PORTB + + ). When we are increasing the value by 1, the last bit (LSB) will vary each cycle of the program from "0" to "1" and vice versa. Thus, any change in the last bit (which is actually a change to the pin RB0) from "0" to "1" will cause the INTF flag to be set. The change in the value in the last bit of PortB is described in the example below:
| 00000000 | a change from 0 to 1 |
| 00000001 | |
| 00000010 | a change from 0 to 1 |
| 00000011 | |
| 00000100 | a change from 0 to 1 |
| 00000101 | |
| 00000110 | a change from 0 to 1 |
| 00000111 |
In order for us to work with the interrupts, we need to learn another function: interrupt function. This function is a special function. So far functions were called from the main program or other functions. The interrupt functions is called by the hardware itself and operates by following steps:
- After the interrupt function is loaded into the memory, the function waits for a moment for the interrupt to occur;
- When the interrupt has occurred, the operating system stops the execution of the main function and “free itself” to perform the interrupt function;
- After the execution of the interrupt function, the operating system continues to run the main function from the place it stopped before the interrupt has occurred.
#include <pic.h>
int i=0;
int j=0;
//---Function Definition-----
//--Interrupt Beep function--
interrupt beep(void)	// Interrupt function definition
{
	if (INTF) // If the external flag is 1, do .....
	{
		INTF=0;	// Reset the external interrupt flag
		for(i=0;i<300;i++)	// A loop for creating a beep sound
		{
			RA4=0;	// By setting LED RA4 high and low...
			RC2=1;	//  the will blink
			for(j=0;j<10;j++); // By setting the RC2 high and low ...
			RA4=1;	//freguently, a sound is generated
			RC2=0;
			for(j=0;j<10;j++);
		}
	}
}
//--Main Funtion --
void main(void)
{

TRISA=0;  // Ser PORT A as an OUTPUT
TRISB=0;	// Set PORT B as an OUTPUT

TRISC=0;	// Set PORT C as an OUTPUT

  PORTC=0;	// Set the value of PORT C to 0

  INTF=0;		// Reset the external interrupt flag

  INTE=1;		// Enable external interrupts from RB0

  GIE=1;		// Global interrupt enable

  while(1)

  {

  PORTB++;// Increase the PORT B value by 1.

  for(i=0;i<30000;i++);		// a simple delay
 }

  }